Struggling to get the best performance out of your applications on Windows 11? Allocating more CPU resources can help. Here’s how you can do it.
By following these steps, you will ensure that your applications and WSL2 in Windows 11 have the necessary CPU and memory resources to run efficiently.
How can I allocate more CPU to a process?
1. Configure .wslconfig File
- Open Notepad as Administrator:
- Press Start, type Notepad, right-click on Notepad, and select Run as administrator.
- Open .wslconfig:
- In Notepad, go to File > Open and paste %UserProfile%/.wslconfig in the file path field, then click Open. If the file doesn't exist, create a new file named .wslconfig in your user profile directory.
- Edit the Configuration:
- Copy and paste the following configuration into the .wslconfig file:[wsl2]
memory=10GB
processors=6
- Adjust the values of memory and processors as needed.
- Copy and paste the following configuration into the .wslconfig file:[wsl2]
- Save the File:
- Click File > Save to save the changes.
- Restart WSL:
- Open Command Prompt or PowerShell as Administrator and run:wsl --shutdown
- Next, restart the WSL service by running:restart-service LxssManager
- Open Command Prompt or PowerShell as Administrator and run:wsl --shutdown
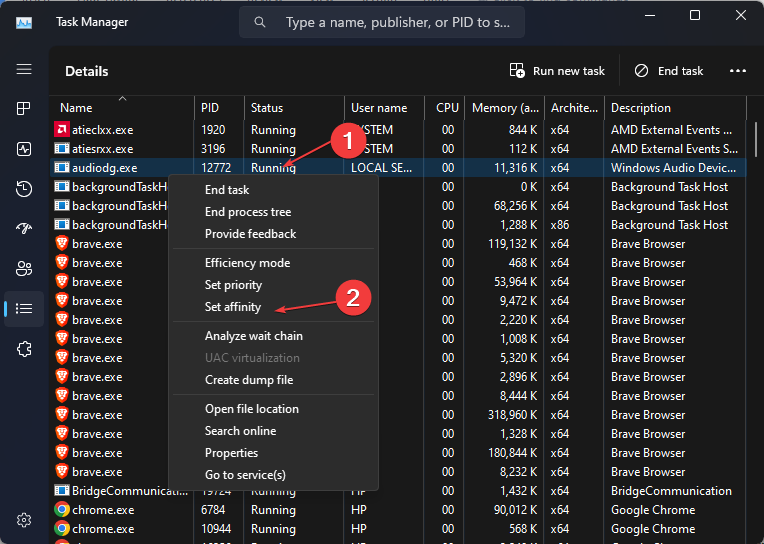
2. Allocate More CPU to a Process Using Task Manager
- Right-click on the Start button and select Task Manager.
- Navigate to the Details Tab.
- Right-click on the program you wish to allocate more CPU. Next, click on the Set Affinity option from the pop-up menu.

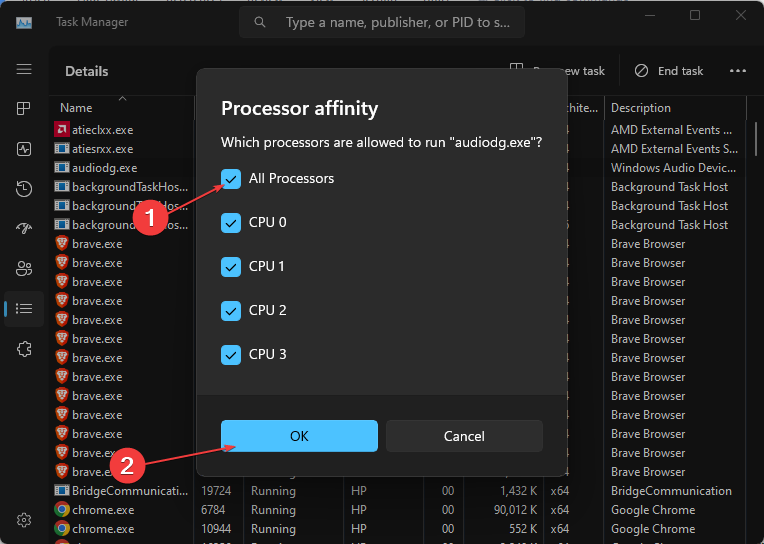
- Then, select the cores you want to assign to this particular process from the options listed as CPU0, CPU1, CPU2, and CPU3 (for quad-core chipsets).

- Lastly, click on OK to apply the changes.
3. Optimize CPU for Best Performance
- Open System Properties:
- Right-click the This PC icon on the desktop or file explorer, and select Properties.
- Advanced System Settings:
- Click on Advanced system settings on the left pane.
- Performance Settings:
- Under the Advanced tab, click Settings in the Performance section.
- Adjust for Best Performance:
- Select Adjust for best performance, then click Apply and OK.
- Restart Your PC:
- Restart your PC to apply the changes.
4. Use Windows 11 Graphics Settings
- Open Settings:
- Press Windows key + I to open the Settings app.
- Navigate to Display:
- Go to System > Display.
- Access Graphics Settings:
- Scroll down and click on Graphics.
- Add Application:
- Select Desktop app from the drop-down menu, then click Browse to find and select the application's .exe file.
- Set High Performance:
- Click on the added application, select Options, choose High performance, and click Save.
By following these steps, you will ensure that your applications and WSL2 in Windows 11 have the necessary CPU and memory resources to run efficiently.