If you've noticed that your Windows 11 PC isn't utilizing all the RAM installed in your system, it can be frustrating, especially if you're running resource-intensive applications or multitasking. This issue can stem from several factors, including system settings, hardware limitations, or software conflicts.
Fortunately, there are several steps you can take to resolve this problem and ensure that Windows 11 is making full use of your available RAM. This guide will walk you through the process.
To calculate the value in the text field earlier, check the installed RAM in your system, and multiply it by 1024 to find the value in MB (Megabyte).
Fortunately, there are several steps you can take to resolve this problem and ensure that Windows 11 is making full use of your available RAM. This guide will walk you through the process.
What do I do if Windows 11 is not using all RAM?
1. Check How Much RAM Is Usable
Before diving into fixes, it's essential to confirm how much RAM your system is recognizing and using:- Open Task Manager:
- Press Ctrl + Shift + Esc to open Task Manager.
- Check RAM Usage:
- Click on the Performance tab and select Memory from the left-hand menu.
- Here, you can see the Total amount of RAM installed and the Available or In use RAM.
2. Verify Your System Configuration
One common reason Windows 11 might not be using all your RAM is a misconfigured system setting:- Open System Configuration:
- Press Windows + R, type msconfig, and press Enter.
- Check Boot Settings:
- Go to the Boot tab and click on Advanced options.
- Ensure that the Maximum memory checkbox is unchecked. If it’s checked, uncheck it and click OK.
- Click Apply and OK to save the changes.
3. Check for 32-bit Operating System
If your PC is running a 32-bit version of Windows 11, it won't be able to use more than 4 GB of RAM, regardless of how much is installed:- Check Your Windows Version:
- Press Windows + I to open Settings.
- Go to System > About.
- Under Device specifications, check the System type.
- If it says 32-bit operating system, your system is limited to 4 GB of RAM.
4. Update Your BIOS/UEFI Firmware
Sometimes, outdated BIOS/UEFI firmware can cause issues with RAM detection:- Check Your BIOS/UEFI Version:
- Restart your computer and enter the BIOS/UEFI settings (usually by pressing Del, F2, or Esc during startup).
- Check the version number of your BIOS/UEFI.
- Update the BIOS/UEFI:
- Visit the motherboard manufacturer's website and search for your motherboard model.
- Download the latest BIOS/UEFI firmware and follow the instructions provided by the manufacturer to update it.
5. Modify the usable RAM
- Press Windows + S to launch the Search menu, enter System configuration in the text field at the top, and click on the relevant search result that appears.
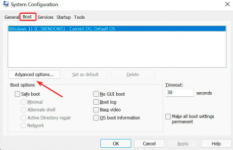
- Now, go the Boot tab and click on Advanced options.
- Tick the checkbox for Maximum memory, enter the installed RAM on your system in the text field underneath, and then click on OK at the bottom.
- Again, click on OK to save the changes and close the System Configuration window.
- Restart the computer.
- In case it doesn’t work, uncheck the Maximum memory checkbox in BOOT Advanced Options window, and save the changes.
To calculate the value in the text field earlier, check the installed RAM in your system, and multiply it by 1024 to find the value in MB (Megabyte).
6. Test for Faulty RAM
If none of the above steps work, it's possible that one or more of your RAM modules is faulty:- Run Windows Memory Diagnostic:
- Press Windows + R, type mdsched.exe, and press Enter.
- Choose Restart now and check for problems to run the Windows Memory Diagnostic tool.
- Check for Errors:
- Your computer will restart and begin the memory test. If errors are found, this could indicate a problem with one of your RAM sticks.
7. Consider Software Conflicts
Sometimes, third-party software, especially certain system utilities, can interfere with RAM usage:- Check Installed Programs:
- Go to Settings > Apps > Apps & features.
- Look for any recently installed software that could be conflicting with your system’s memory management.
- Disable or Uninstall Problematic Software:
- If you suspect a particular program, try disabling it temporarily or uninstalling it to see if the RAM usage improves.
8. Reinstall Windows 11
As a last resort, if none of the above solutions work, consider reinstalling Windows 11. This can resolve any deep-seated software issues that might be preventing the system from using all available RAM:- Backup Your Data: Ensure all important files are backed up.
- Reinstall Windows 11:
- Use the Reset this PC feature from Settings > System > Recovery.
- Choose to keep your files or perform a clean install.